Table of Content
16×2 LCDArduinoD4 – D7Pin 10,11,12,13EnablePin 9RSPin 8RWGNDVEE10k POT VSSGNDVCC+5VLED++5VLED-GNDWe have an Arduino library for easy communication between LCDs called theLiquidCrystallibrary. However, we will use 4 of these pins to connect with Arduino. A precision IC temperature sensor with its output proportional to the temperature .

Keywords- Home automation; Smartphone; Arduino; Bluetooth; Home appliances. The TXD pin of Arduino is connected to RXD pin HC-05 and the RXD pin of Arduino is connected to TXD pin of HC-05. One end of 220VAC to all common terminals of relay and other ends with other terminals of the light lamps. Connect one end of all bulbs to the normally open terminal of relays. We will be using the 4 relay Arduino module in our home automation project.
Code for Home Automation Using Arduino and Bluetooth
There are many such technologies by which many more difficulties are entering. This is a special issue which examines the most recent contributions of IoT platform as well as in the progress of the trending technologies. A statement from IoT is that, monitor and control any technology from anywhere, anytime, wireless, fastest. Automation means all the appliances connected to the system can control by the Bluetooth-based app which can run on any mobile phone. You can make this application by yourself by using the MIT app inventor too. I hope you all will succeed to make this project by yourself you have to read and follow all the instructions given in the article.

Here IoT comes across as a technology which transforms the way we perceive our surroundings. IoT is considered to be a network of interconnected physical objects/things around us that communicate with each other over the Internet. These days, the need for efficient controlling of appliances to minimize power wastage is important as fossils and non-renewable sources of energy are plummeting. So, a smart home system has been developed to monitor and control home appliances remotely from anywhere. This has been executed on a virtual simulator namely Proteus where the hardware circuitry has been designed. Blynk app has been used to send the user's command to the circuit through the local cloud server connected with Arduino and Bluetooth module.
About this project
If you have any queries in the post you can ask us in the comment section. We also sell projects in our Projects section on the homepage. Moreover, set the value of the pins connected with the three bulbs to HIGH by using digitalWrite() function. Specify the pin as the first parameter and the value as the second parameter. Configure the pins connected with the bulbs and the TX pin as output pins and the RX pin as an input pin. Specify the pin as the first parameter and the mode as the second parameter.
In the current strategy taking a reading and creating bills is manual works. Power appropriations are one of the largest difficulties in India. Periodically user not spent bills on period so the electricity committee worker cut the power supply manually. In this topic sometimes fraud is done by the user or that employee which leads to the loss of electricity committee.
Home Automation Using Arduino and Bluetooth
Print a series of messages on the LCD display with delays in between. Initially all the three bulbs are off hence it will be displayed on the LCD. In our case, the pins are 8, 9, 10, 11, 12, and 13 respectively. First of all, open the Play Store of your Android Smartphone and search for “Bluetooth Control for Arduino”. Arduino 5V Pin, but LCD Display LED + Pins connected to Arduino 5V Pin through 220ohm resistor.

The communication between the cell phone and the Arduino BT board is wireless. A low cost and wireless controlled automation system was designed by researchers. Bluetooth technology was used to provide remote controlled wireless access to user. It is a small portable device that is used to be connected in the Arduino board so that it can communicate with mobile or smartphone. In this blog, we will show you how to get started with a simple home automation project wherein you will be able to control your home appliances with the help of your smartphone using Bluetooth. This function is responsible for controlling the bulbs by comparing the strings received in the buffer and the command in the application.
If this value is matching then Arduino sends operating voltage to the relay module. Home Automation Using Arduino and Bluetooth is an IoT project to control our home appliances like light, fan, cooler, etc. from a Smartphone. In this project, we use Arduino Uno and HC-05 Bluetooth Module and we give the command from our smartphone. To add Bluetooth functionality, we will use the HC-05 Bluetooth module.
Smartphone is used to communicate with Arduino board using a smartphone application and Bluetooth technology. In this research work Bluetooth module HC 05 and Arduino Uno are used for hardware implementation. Bluetooth module receives them and the Arduino performs the operation, displays the status on the LCD, and sends a message back to the mobile. In this Arduino project, we will create a home automation system that will control home appliances via HC-05 Bluetooth and an Android application. HC-05 Bluetooth will be used to communicate with Arduino using an Android Application known as the S2 Terminal.There are also other apps but this is free and easy to use.
These Lode Values are used in Arduino code to control a particular device by a particular app button. The Load values of the App buttons and their use is described in the below list. This is a 6 pin module, but in this project, we will use only 4 pins, these are VCC, GND, TX, and RX. This blog is based on Home Automation using Arduino and Bluetooth HC-05 Module. Here we will discuss Introduction to Bluetooth Controlled Home Automation System, Project Concept, Block Diagram, components required, circuit diagram, working principle, and Arduino code. DC motor is used to move a gearbox with a large reduction ratio.
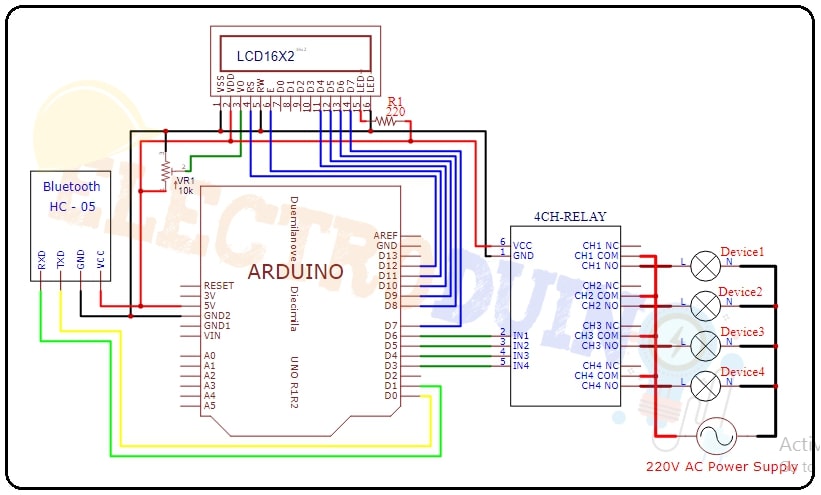
Moreover, also specify the Arduino digital pins connected with TX and RX pins of the HC-05 module. Specify the Arduino pins connected with IN1, IN2, and IN3 of 4 Channel Relay Module. ELECTRODUINO.COM is a free online platform, it provides A Better Way to Learn Electronics.
Electroduino Tutorials help electronics lovers, makers, hobbyists, and engineers to learn and build electronics projects. We provide complete insight and technical details about electronic components and project tutorials and guides to implement projects. Now considering room scenario, an Arduino UNO will control devices and reads sensor data. The figure "Room Architecture" depicts how the Arduino UNO will connects with the devices and sensors. Room have multiple controllable devices(i.e. Light, Fan, Wall Socket, etc.), one PassiveIR , one temperature sensor and LDR . After connected Bluetooth, your app screen will be like the above image now you can control the system, with the on and off button.

Here the code is given you only need to upload the code to the Arduino using Arduino IDE software. If you don’t know the process you can refer to our tutorial given in the Arduino tutorial under the blog section. If you have any query you can ask us in the comment section and also you can reach us on Instagram. If you want to edit the app according to your need by import below aia file in MIT App Inventor.


No comments:
Post a Comment